# How to Build a Global Internationalization (I18n) App with Next.js and AI

Canonical: https://eunit.me/blog/build-a-global-internationalization-i18n-app-with-nextjs-and-ai
Authors: Emmanuel Uchenna
Published: 2026-01-10T00:00:00+00:00
Category: Technical

Learn to build a global I18n app with Next.js & AI. Scrape and localize any website into 83+ languages using Apify. Ship global apps without the headache.

# How to Build a Global Internationalization (I18n) App with Next.js and AI

Before the proliferation of AI, localization was often a nightmare. You had to hire translators, manage extensive JSON files for every language, and pray that your context didn't get lost in translation. If you wanted to translate an *entire website* on the fly? Forget about it. That was a job for enterprise giants with bottomless budgets.

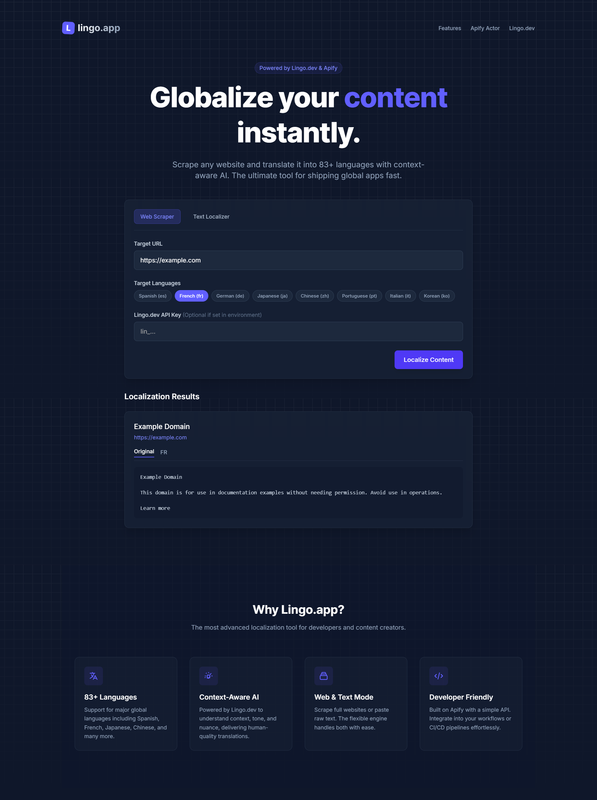
In this article, we will build [**Lingo.app**](https://lingo-app-azure.vercel.app/) from scratch. It is a stunning, production-ready web application that can scrape any website and instantly localize its content into 83+ languages. We will do this using the power of **Next.js**, **Tailwind CSS**, and the [**AI Website Content Localizer & Scraper**](https://apify.com/eunit/ai-website-content-localizer-scraper) Actor on the [Apify platform](https://apify.com/store?fpr=eunit).

We wrote this article for developers who want to ship global apps without the headache. Intermediate developers can likely speed through the setup, but we will explain every step clearly.

By the end of this article, you will have a fully functional app that manages scraping of any website, context-aware AI translation, and UI state—all in a scalable Next.js architecture.

If you are excited, then let’s dive in.

## TL;DR

* Checkout the complete repository on GitHub: [https://github.com/Eunit99/lingo.app](https://github.com/Eunit99/lingo.app) 📖
* Checkout the deployed version of the Lingo.app live: [https://lingo-app-azure.vercel.app/](https://lingo-app-azure.vercel.app/) 🚀

![lingo.app screenshot](https://i.postimg.cc/zGdwdXZ7/screenshot-2026-01-10-at-10-21-47.png)

## The Architecture

We are keeping it modern and simple:

* **Frontend**: Next.js 15 (App Router) for the framework.
* **Styling**: Tailwind CSS v4 for that premium, dark-mode aesthetic.
* **Backend**: A Next.js API Route acting as a secure proxy.
* **Intelligence**: The **AI Website Content Localizer & Scraper** Actor on Apify, which handles the headless browser scraping (Playwright) and AI translation (Lingo.dev).

### File tree

Below is how the file structure of this app will be:

```txt
|   .gitignore
|   next-env.d.ts
|   eslint.config.mjs
|   next.config.ts
|   postcss.config.mjs
|   tsconfig.json
|   package.json
|   package-lock.json
|   env.example
|   .env.local
|   tsconfig.tsbuildinfo
|   README.md
|   
+---app
|   |   page.tsx
|   |   globals.css
|   |   icon.png
|   |   layout.tsx
|   |   
|   \---api
|       \---localize
|               route.ts
|               
+---public
|       grid.svg
|       
+---components
|       Features.tsx
|       Hero.tsx
|       LocalizationForm.tsx
|       
+---lib
|       apify.ts
```

## Prerequisites

To follow along, you will need:

* **Node.js** installed (v18 or higher).
* An **Apify account**. You can [sign up for free](https://console.apify.com/sign-up?fpr=eunit).
* A text editor like VS Code.

## Step 1: Initialize the project

First, we create a new Next.js application. We use the `--no-src-dir` flag to keep our project root clean and flat.

```bash
npx create-next-app@latest lingo.app --typescript --eslint --tailwind --no-src-dir --app
```

Navigate into your new directory and install the necessary dependencies, specifically the explicit React types to avoid TS errors and the Apify client.

```bash
cd lingo.app
npm install apify-client
npm install --save-dev @types/react @types/react-dom
```

### Setting up the Global Design System

We want a premium feel right from the start. Open `app/globals.css` and replace the default styles with this modern Tailwind v4 setup. We are defining a deep slate color palette for a developer-focused dark mode.

```css
@import "tailwindcss";

:root {
  --background: #0f172a; /* Slate 900 */
  --foreground: #f8fafc; /* Slate 50 */
}

body {
  color: var(--foreground);
  background: var(--background);
  font-family: Arial, Helvetica, sans-serif;
  overflow-x: hidden;
}

@layer components {
  .btn-primary {
    @apply px-6 py-3 bg-indigo-600 hover:bg-indigo-500 text-white rounded-lg font-medium transition-all duration-200 shadow-lg hover:shadow-indigo-500/30 active:scale-95 disabled:opacity-50 disabled:cursor-not-allowed;
  }
  .input-field {
    @apply w-full bg-slate-800 border border-slate-700 rounded-lg px-4 py-3 text-white placeholder-slate-400 focus:outline-none focus:ring-2 focus:ring-indigo-500 focus:border-transparent transition-all;
  }
  .card {
    @apply bg-slate-800/50 backdrop-blur-md border border-slate-700/50 rounded-xl p-6 shadow-xl;
  }
}
```

Next, let's configure the root layout to apply this background globally. Open `app/layout.tsx`. We are adding a subtle grid background pattern for texture.

```tsx
import type { Metadata } from 'next';
import { Inter } from 'next/font/google';
import './globals.css';

const inter = Inter({ subsets: ['latin'] });

export const metadata: Metadata = {
  title: 'Lingo.app - Globalize Your Web',
  description: 'Instantly localize any website or text into 83+ languages using AI.',
};

export default function RootLayout({
  children,
}: {
  children: React.ReactNode;
}) {
  return (
    <html lang="en">
      <body className={`${inter.className} min-h-screen bg-gradient-to-br from-slate-900 via-slate-900 to-indigo-950 selection:bg-indigo-500/30`}>
        {/* Subtle Grid Background */}
        <div className="fixed inset-0 bg-[url('/grid.svg')] bg-center [mask-image:linear-gradient(180deg,white,rgba(255,255,255,0))]" />
        
        <main className="relative z-10 w-full max-w-7xl mx-auto px-4 sm:px-6 lg:px-8 py-8">
             {/* Simple Header */}
            <header className="flex justify-between items-center py-6 mb-12">
                <div className="flex items-center space-x-2">
                    <span className="text-2xl font-bold bg-clip-text text-transparent bg-gradient-to-r from-white to-slate-400">lingo.app</span>
                </div>
            </header>
            {children}
        </main>
      </body>
    </html>
  );
}
```

> **(Note: You will need a simple `public/grid.svg` file for the background. You can find free SVG patterns online or generate one.)** See the one use for the lingo.app project on [GitHub](https://github.com/Eunit99/lingo.app/blob/main/public/grid.svg).

## Step 2: Integrate the Apify Client

Now for the engine room. We need a way to communicate with the Apify platform securely.

### The Client Wrapper (`lib/apify.ts`)

This client will enable communication with the [AI Website Content Localizer & Scraper Actor](https://apify.com/eunit/ai-website-content-localizer-scraper) on Apify.

![AI Website Content Localizer & Scraper](https://i.postimg.cc/5NVbgTzk/screenshot-2026-01-10-at-13-04-00.png)

Create a folder `lib` and a file `apify.ts`. This acts as our localized SDK. It initializes the client and defines the types for our input.

```typescript
import { ApifyClient } from 'apify-client';

export interface LocalizerInput {
  token: string;
  lingoApiKey: string; // The secret key for Lingo.dev
  mode: 'WEB' | 'TEXT';
  targetLanguages: string[];
  startUrls?: { url: string }[];
  text?: string;
}

export const runLocalizerActor = async (params: LocalizerInput) => {
  const { token, lingoApiKey, mode, targetLanguages, startUrls, text } = params;
  
  const client = new ApifyClient({
    token: token,
  });

  const input = {
    mode,
    lingoApiKey,
    targetLanguages,
    startUrls: mode === 'WEB' ? startUrls : undefined,
    text: mode === 'TEXT' ? text : undefined,
  };

  try {
    // Run the Actor and wait for it to finish
    const run = await client.actor("eunit/ai-website-content-localizer-scraper").call(input);

    if (!run) {
        throw new Error("Actor run failed to start or return.");
    }

    // Fetch results from the default dataset
    const { items } = await client.dataset(run.defaultDatasetId).listItems();
    return items;
  } catch (error) {
    console.error("Apify Actor Run Error:", error);
    throw error;
  }
};
```

### The API Proxy (`app/api/localize/route.ts`)

We cannot leak our Apify API Token to the client-side browser code. To solve this, we create an API Route that acts as a proxy. The client sends the URL/Text, and the server attaches the token and calls Apify.

Create `app/api/localize/route.ts`:

```typescript
import { NextResponse } from 'next/server';
import { runLocalizerActor } from '@/lib/apify';

export async function POST(req: Request) {
  try {
    const body = await req.json();
    const { url, text, mode, targetLanguages, lingoApiKey } = body;

    const apifyToken = process.env.APIFY_API_TOKEN;

    if (!apifyToken) {
      return NextResponse.json({ error: "Server misconfigured: APIFY_API_TOKEN missing. Please set it in .env.local" }, { status: 500 });
    }

    const finalLingoKey = lingoApiKey || process.env.LINGO_API_KEY;
    if (!finalLingoKey) {
      return NextResponse.json({ error: "Lingo API Key is required. Please provide it in the form or set LINGO_API_KEY env." }, { status: 400 });
    }

    if (mode === 'TEXT' && text && text.length > 500) {
      return NextResponse.json({ error: "Text content exceeds the 500 character limit." }, { status: 400 });
    }

    const startUrls = url ? [{ url }] : undefined;

    // Default languages if not provided
    const languages = targetLanguages && targetLanguages.length > 0 ? targetLanguages : ['es', 'fr', 'de'];

    const items = await runLocalizerActor({
      token: apifyToken,
      lingoApiKey: finalLingoKey,
      mode: mode as 'WEB' | 'TEXT',
      targetLanguages: languages,
      startUrls,
      text
    });

    return NextResponse.json({ success: true, data: items || [] });
  } catch (error: any) {
    console.error("API Route Error:", error);
    return NextResponse.json({ success: false, error: error.message || "Unknown error" }, { status: 500 });
  }
}

```

To prevent usage abuse and manage API costs, we implemented a strict 500-character limit across both the frontend and backend.

In the user interface in `components/LocalizationForm.tsx`, we verified that the localizer input remains within bounds by adding a `maxLength` attribute and a real-time character counter (e.g., "0/500") that visually alerts the user as they type.

Crucially, we backed this up with server-side validation in `app/api/localize/route.ts`. Before sending any data to Apify, the API route checks the text length and immediately rejects requests exceeding 500 characters with a `400 Bad Request`. This ensures the application remains secure and cost-efficient, even if the client-side restrictions are bypassed.

## Step 3: Building the UI Components

Now let's build the interactive frontend.

### The Hero Component

In `components/Hero.tsx`, we create a bold introduction.

```tsx
import React from 'react';

export default function Hero() {
  return (
    <div className="text-center max-w-3xl mx-auto space-y-6">
      <div className="inline-flex items-center space-x-2 px-3 py-1 rounded-full bg-indigo-500/10 border border-indigo-500/20 text-indigo-400 text-sm font-medium mb-4">
        <span>Powered by Lingo.dev & Apify</span>
      </div>
      <h1 className="text-5xl md:text-7xl font-extrabold tracking-tight text-white leading-tight">
        Globalize your <span className="text-indigo-500">content</span> instantly.
      </h1>
      <p className="text-lg md:text-xl text-slate-400 max-w-2xl mx-auto">
        Scrape any website and translate it into 83+ languages with context-aware AI.
        The ultimate tool for shipping global apps fast.
      </p>
    </div>
  );
}
```

[![Lingo.app UI](https://i.postimg.cc/FFqJK92J/screenshot2.png)](https://lingo-app-azure.vercel.app/)

### The Main Logic: LocalizationForm

This is where the user interacts with the app. We need to handle:

1. Toggling between **WEB** (URL) and **TEXT** mode.
2. Selecting target languages.
3. Calling our API route.
4. Displaying the results in a tabbed interface.

Create `components/LocalizationForm.tsx`:

```tsx
'use client';

import React, { useState } from 'react';

export default function LocalizationForm() {
  const [mode, setMode] = useState<'WEB' | 'TEXT'>('WEB');
  const [url, setUrl] = useState('');
  const [textInput, setTextInput] = useState('');
  const [selectedLangs, setSelectedLangs] = useState<string[]>(['es', 'fr', 'de']);
  const [loading, setLoading] = useState(false);
  const [results, setResults] = useState<any[]>([]);

  // ... (Toggle logic helper functions)
  
  const popularLangs = [
    { code: 'es', label: 'Spanish' },
    { code: 'fr', label: 'French' },
    { code: 'de', label: 'German' },
    { code: 'ja', label: 'Japanese' },
    { code: 'zh', label: 'Chinese' },
    { code: 'pt', label: 'Portuguese' },
    { code: 'it', label: 'Italian' },
    { code: 'ko', label: 'Korean' },
  ];

  const toggleLang = (code: string) => {
    if (selectedLangs.includes(code)) {
      setSelectedLangs(selectedLangs.filter(c => c !== code));
    } else {
      setSelectedLangs([...selectedLangs, code]);
    }
  };

  const handleSubmit = async (e: React.FormEvent) => {
    e.preventDefault();
    setLoading(true);
    setResults([]);

    try {
      const res = await fetch('/api/localize', {
        method: 'POST',
        headers: { 'Content-Type': 'application/json' },
        body: JSON.stringify({
          mode,
          url: mode === 'WEB' ? url : undefined,
          text: mode === 'TEXT' ? textInput : undefined,
          targetLanguages: selectedLangs,
        }),
      });

      const data = await res.json();
      if (data.success) {
          setResults(data.data);
      }
    } catch (err) {
      console.error(err);
    } finally {
      setLoading(false);
    }
  };

  return (
    <div className="w-full max-w-4xl mx-auto space-y-8">
      <div className="card">
        {/* Mode Toggles */}
        <div className="flex space-x-4 mb-6 border-b border-slate-700/50 pb-4">
          <button onClick={() => setMode('WEB')} className={`... ${mode === 'WEB' ? 'text-indigo-400' : 'text-slate-400'}`}>
            Web Scraper
          </button>
          <button onClick={() => setMode('TEXT')} className={`... ${mode === 'TEXT' ? 'text-indigo-400' : 'text-slate-400'}`}>
            Text Localizer
          </button>
        </div>

        <form onSubmit={handleSubmit} className="space-y-6">
            {/* Input Fields specific to mode */}
            {mode === 'WEB' ? (
                <input type="url" value={url} onChange={(e) => setUrl(e.target.value)} className="input-field" placeholder="https://example.com" />
            ) : (
                <div>
                  <div className="flex justify-between items-center mb-2">
                    <label className="block text-sm font-medium text-slate-300">Text Content</label>
                    <span className={`text-xs ${textInput.length >= 500 ? 'text-red-400' : 'text-slate-500'}`}>
                      {textInput.length}/500
                    </span>
                  </div>
                  <textarea
                    placeholder="Paste your text here to localize..."
                    className="input-field min-h-[150px]"
                    value={textInput}
                    onChange={(e) => setTextInput(e.target.value.slice(0, 500))}
                    maxLength={500}
                    required={mode === 'TEXT'}
                  />
                </div>
            )}
            
            {/* Language Selector Logic Here */}
            {/* ... */}
            
            <div className="flex justify-end">
                <button type="submit" disabled={loading} className="btn-primary">
                    {loading ? 'Processing...' : 'Localize Content'}
                </button>
            </div>
        </form>
      </div>
      
      {/* Results Rendering */}
      {results.map((item, idx) => (
          <ResultCard key={idx} item={item} />
      ))}
    </div>
  );
}

function ResultCard({ item }: { item: any }) {
    // Shows original vs localized tabs
    // ...
}
```

## Step 4: Page Assembly

Finally, we string it all together in `app/page.tsx`.

```tsx
import React from 'react';
import Hero from '@/components/Hero';
import LocalizationForm from '@/components/LocalizationForm';
import Features from '@/components/Features';

export default function Home() {
  return (
    <div className="flex flex-col space-y-24">
      <div className="flex flex-col items-center justify-start space-y-12">
        <Hero />
        <LocalizationForm />
      </div>
      <Features />
    </div>
  );
}
```

## Why the Apify Actor Integration Wins

You might be wondering: *"Why can't I just use `fetch` to get the HTML and send it to ChatGPT?"*

You could try, but you would likely fail for three reasons. Integrating the **AI Website Content Localizer & Scraper** Actor via Apify solves these specific engineering headaches:

### 1. The "Context" Problem

Standard LLMs see text as a flat string. They don't know that "Home" is a navigation button or that "Get Started" is a primary CTA. If you strip the HTML, you lose the context. If you keep the HTML, you confuse the model with thousands of lines of markup.

This [AI Website Content Localizer & Scraper](https://apify.com/eunit/ai-website-content-localizer-scraper) Actor is smart. It extracts the semantics of the page, identifies the translatable nodes, and sends them to Lingo.dev, which is specifically trained to understand UI and content context. The result? Buttons stay short, and articles sound natural.

### 2. The Scraping Battlefield

Modern websites are hostile. They use hydration (client-side rendering), anti-bot protections (Cloudflare, CAPTCHAs), and complex DOM structures.

* **Without Apify**: You have to manage a fleet of headless browsers, rotate proxies, handle retries, and parse dynamic JavaScript.
* **With Apify**: You make one API call. The Actor handles the headless browser infrastructure, proxy rotation, and Playwright execution for you.

### 3. Serverless Scalability

Translating a massive documentation site or a large e-commerce catalog requires significant computing power. If you run this logic in your own Next.js API route, you risk timeouts and server crashes.

By offloading this to [Apify](https://console.apify.com/sign-up?fpr=eunit), you get a serverless queue system. You can submit up to 100 URLs at once, and the Apify platform scales up the necessary Actors to process them in parallel. Your Next.js app remains lightweight and responsive.

## Step 5: Setup & Deploy

We are ready to launch. Create a `.env.local` file in your root folder:

```bash
APIFY_API_TOKEN=your_apify_token
LINGO_API_KEY=your_lingo_key
```

Get your `APIFY_API_TOKEN` by signing up at [Apify](https://console.apify.com/sign-up?fpr=eunit). Apify gives you a free 5$ credit every month. This is more than enough to build your first app.

To get your `LINGO_API_KEY`, sign up at [Lingo.dev](https://lingo.dev). Lingo.dev gives you 10, 000 free words per month to try out new things.

![Lingo.dev API usage](https://i.postimg.cc/YSMwfWm2/screenshot-2026-01-10-at-13-30-46.png)

Once set, it is time to run your app.

### Running your App

Run your development server:

```bash
npm run dev
```

Open `http://localhost:3000`, and you will see your global localization app, ready to scrape and translate the web.

## Wrapping Up

We didn't just build a demo. We built a tool that addresses a real business problem: accessing global information. By using the **[AI Website Content Localizer & Scraper on Apify](https://apify.com/eunit/ai-website-content-localizer-scraper)**, we offloaded the most challenging aspects of scraping and AI context management, allowing us to focus on building a premium user experience.

If you are building global applications, you need tools that scale with you. Check out the **[AI Website Content Localizer & Scraper on Apify](https://apify.com/eunit/ai-website-content-localizer-scraper)**.

Happy building 🚀